The Bowmar Builders are an FLL team associated with Bowmar Elementary School. The purpose of this blog is to help other students interested in robotics to learn from what we have learned. As an FLL Robotics team we use the Lego EV3 robotics system and the Mindstorms graphical programming language.

Saturday, January 29, 2022

The PackageSafe(tm) System

Why PackageSafeTM?

Packages often are damaged by water and the weather when they are delivered. Some estimates have up to 10% of packages are damaged by weather. PackageSafeTM is a system for customers and businesses to reduce or even eliminate packages being damaged by rain and snow. 

What is PackageSafeTM?

PackageSafeTM is a system of products that can be used by customers receiving packages as well as businesses sending packages. 
  • PackageSafeTM containers for consumer package delivery
  • Logos and labeling to instruct delivery staff where to place packages
  • Directions for what makes a PackageSafeTM
  • Licensing for use of the PackageSafeTM logos
  • Guidance for websites wanting to encourage the use of the PackageSafeTM

How do you use it?

There are directions for each of the different parts of the PackageSafeTM System.

Customer Receiving Packages

There are many kinds of PackageSafeTM. You can make your own or you can purchase a standardized one. If you build one yourself you can choose the size and materials. If your house already has a good overhang that shelters packages from the weather, such as a covered porch, then you can just get the signs and labels to mark the location. If you purchase or build a container, then you will need to also get the signs and labels to mark the PackageSafeTM

Location: A PackageSafeTM should be placed someplace visible where the package delivery people can quickly see it and quickly access it.

Signs: The PackageSafeTM should be clearly labeled. If it is on the side of a house or some location that it not obvious at first glance, there should be a small sign that directs package delivery people to it.

Package Delivery People

Simply look for the PackageSafeTM markings and place the packages in the PackageSafeTM. If it has a lid, close the lid. 

Businesses and Website Developers

Promote the PackageSafeTM on your website. When your customers have a PackageSafeTM your products are less likely to be damaged from weather and you will save money on returns. 

Be Weather-wise: When customers are checking out, have your website look up the weather for the destination and date of delivery. You can then give the customers options if there are likely to be weather impacts. You can charge more for weatherproof packaging, you can offer to delay a day or two when the weather won't impact delivery, or if they have a PackageSafeTM then it can be delivered in the rain or snow.

How do you get one?

You can purchase a container that meets the PackageSafeTM design guidelines or you can make one yourself.


Sunday, October 17, 2021

Using Rack and Pinion for Steering a Robot

 Using Rack and Pinion Gears for Steering a Robot

By Julia Byrd
October 17th, 2021


After my last experiment in using rack and pinion gears, I was googling and noticed a picture of a rack and pinion gear for a car. So I wanted to use one to steer some wheels.

I used the blue wheels and the large rack gear. It took some trial and error to figure out how to connect the rack to the wheel.


Connecting both wheels, I noticed that it would wiggle a lot and I needed a) something to push against, and b) hold the rack up in place.


I added a regular beam to the other side. I should be able to use the blue regular beam to connect the wheels to the robot frame. By holding one part of the steering mechanism in place I can use that to push against and hold the pinion gear.


I'm also experimenting with which way the rack gear works better - rack up, pointing out or rack down, pointing in. This picture shows rack up, pointing out. Now I need to create a frame that holds the wheels, rack and pinion, and a motor.

This setup seemed to work okay. I reused my motor turning code to check it.


It worked. I did notice that because the way the rack is attached to the wheels that it moves back and forth as it turns.


I also noticed the hub doesn't fit too well on top. There is also a lot of space. Time for a re-do.


This looks like it will work okay. The wheels tilt side to side by two holes. The L piece helps push the rack against the pinion. The challenge now is mounting it onto a frame. And figuring out how to make it drive.


Rack and Pinion Gears

Rack and Pinion Gears

By Julia Byrd
October 17, 2021

Today I learned about rack and pinion gears. Rack and pinion gears change a spinning motion into a sliding motion. I also learned about using the light sensor to trigger the motion.

First, I wanted to set up the rack and pinion gears. I saw these in the kit and I wanted to learn how to use them.


Using trial and error I worked out how to hold these together but let them slide back and forth.


Next I wanted to connect it to a motor, so I made a frame for the motor.


Next I wanted to hold them all together so I mounted them on a big yellow plate.


With the motor set up, I tried some code to make the little gear (pinion) turn and move the flat gear (rack).

This worked really well. It took a few tries to figure out that 1.55 turned was the right amount. Next, I wanted it to turn both ways. So I thought I would try using a color sensor to let me choose which way it turns based on the color.


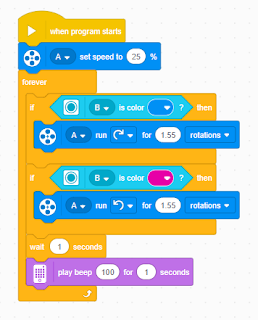
Then I worked up new new code that uses if blocks to choose direction based on color.


This also worked well. I noticed, however, that it would only do it once, and only if I had the color block in front of the sensor when I started the program. So I decided that adding a loop would be helpful. I also added a little wait and a beep in each loop so that I would know what was happening.


This worked just like I wanted. Two things I noticed about this code. First, the beep 100 scared my mom and sounded like the fire alarm! Second, if I held the same color block for too long then it would try to rotate again, but since it was at the end of the rack bad things would happen! In the future, I also would like to make it so that it starts after a certain color is shown.


Monday, September 17, 2018

Space Hazards - Radiation


I believe that the radiation problem is the most interesting because it is the most dangerous. It is challenging because so many things can go wrong that it seems almost impossible. 


Thomas K.

Super Mario Effect - Student Answers


You have to focus really hard on something to accomplish it. If you don’t succeed the first time, try again. You cannot focus on how you can fail.
-Caleb P.

“We can treat life’s challenges and tasks like video games to trick our brains into learning more, making learning more fun”
-Cody B.

The Mario effect is about thinking how you think. You also need to focus on the end goal. 
-Jacob B.

The most important point of the Super Mario effect is that we continue to try because we know success is inevitable.  As a team we can share our experiences and learn how to better navigate the course. The Super Mario effect shows is how to be better students knowing the more we play the better we get. 
-Avery W.

The Super Mario Effect tricks our minds into thinking more and learning more. It makes you think about the end goal and not how you failed. It makes you want to keep on trying. You can use the super Mario effect to change how you learn by making it seem fun and tricking the mind to think that it is a cooler way to learn. It makes you learn as a team because you use each other's minds and not just yours to reach the end goal. If there was no end goal, you won't be motivated. For example, if you are taking a quiz, and the teacher says try to be first, and there is nothing that the teacher is going to give you, you are not going to be motivated to try to be first. We use the super Mario effect to be a better student because we have more fun learning things and learn more. The Super Mario Effect is a really cool way to learn for kids AND adults.
-Heer P.

 The point of the Mario Effect is trying to accomplish a goal, while noticing difficult obstacles and coming up with an easier solution to reach the goal that has been set.
-Ethan S.

The Super Mario Effect is about not giving up but to keep on trying.
-Thomas K.

 The point of the Mario Effect is trying to accomplish a goal, while noticing difficult obstacles and coming up with an easier solution to reach the goal that has been set.
-Samuel W.


Thursday, September 13, 2018

Super Mario Effect

By Coach Byrd

We have been learning about the Super Mario Effect. In essence it involves what is called "metacognition" - thinking about how we think. When we think of learning experiences as tests, we tend to try less and give up more easily. When we think of learning experiences as games and challenges to be conquered, we spend more time learning and they are more fun for us. We get more or less out of the experience based on how we mentally frame the experience.

The challenge for us as coaches for teams of students whose goal as a team is to learn, is to make the learning process more effective. Using the Super Mario Effect is a critical tool to turn challenging situations into fun challenging situations that we want to learn from. Gamification (the Super Mario Effect) is a very helpful approach.

We can learn a lot from the Super Mario Effect:

  • We need a fun, visual, interactive way of framing the problem - You could write down the buttons to push to solve the levels for super mario, but that doesn't make it fun.
  • Focus is on learning from the process and not the failures - When you die in the game, you just start over and try again. Celebrate how far you get and learn from your failures
  • Engaging, hands-on experiences really strengthen the process - Everybody plays, everybody learns.
  • Goals and successes we can celebrate when we accomplish them - you need a Princess Peach to save and when you do, you do your happy dance
  • Appropriate challenges - earlier levels are simpler and have simpler bad guys. Start with challenges appropriate to the skill set and build up. 

Tuesday, August 28, 2018